That said, speaking as someone with five piercings in each ear and one in my nose, that clearly hasn't stopped me before.
Last September, I found myself looking ahead at a 3-day conference bookended by a train journey of roughly six hours involving multiple commuter trains (noteworthy for their complete lack of luggage space) at either end. I had just finished my last big commuting project, and all of my other unfinished projects were not terribly portable. I needed to find something compact and brainless but time-consuming, and I didn't have time to shop around for new tools or supplies. (Besides, the fabric/yarn embargo still stands.)
So it was that I picked up a bone needle and a ball of homespun wool, and took up yet another craft.
A couple of days before the conference, I parked myself on the futon with a pile of expendable acrylic yarn and the Oslo Stitch tutorial on www.en.neulakintaat.fi/. I made a couple of swatches until I was reasonably confident that I could repeat the stitch from memory, and then swapped out the worsted-weight acrylic for my lace-weight homespun Icelandic wool. Because apparently I enjoy learning new skills in hard mode.
Yes, I have heaps of perfectly good worsted and aran weight acrylic yarn that would have made quite serviceable mitts, and that probably would have made an easier (and certainly faster) first project... But while I was at Raglan last year, a couple of ladies in the fibre arts guild got to talking about, and one of them made a comment that stuck with me. She said that the naalbinding that was done in period was far finer than anything we do today. I've seen photos of some fairly chunky extant nalebound items, but assume she was referring to the Coppergate sock, which is indeed quite a bit finer than anything I've seen on Ravelry or at re-enactments.
Challenge accepted.
It took me a few attempts to get a consistent, tight tension. I did make one concession to sanity, holding my yarn doubled so that the fabric would be warm and solid. I worked on the mitts on the train, in the evenings, and during lunch and tea breaks at the conference. I started off trying to tension the stitches around my thumb, but found the resulting fabric too loose. I tried making the loop smaller and pinching it against the pad of my thumb, but that made the tension too inconsistent. Eventually, I switched to tensioning around the needle, and suddenly my naalbinding looked much better. I ended up unraveling the work that I did at the conference and starting over because my stitching had changed so much (for the better) since I began working. I'm much happier with the results now though.
 |
| My first attempt (left) with large gaps in the fabric and inconsistent tension, vs. my second attempt (right) |
 |
| Making the loop for the thumb. (The loop is flipped back on itself in this photo.) |
For the wrists, I switched from Oslo stitch, which makes a tight, warm fabric, to York stitch, which is more stretchy. I worked several rounds until the mitts were as long as I wanted them, and then finished with a few rounds back in Oslo stitch. On the last several rounds, I switched from holding two strands of brown yarn together, to one strand of brown and one grey, then two strands of grey, then one grey and one white, and then two strands of white (also homespun, from an unidentified bag of fleece that was given to me several years ago). I'm very happy with the gradual change in color. Because the grey and white yarns were slightly thicker than the brown, the ends of the mitts flare out slightly in a way that reminds me vaguely of gauntlets. (This amuses me rather a lot.)

To finish the thumbs, I joined a new piece of yarn to the thumb hole and worked around until the tube for the thumb reached my knuckle. I made decreases on the inside of the thumb until it was as comfortably snug, stopping at the knuckle.
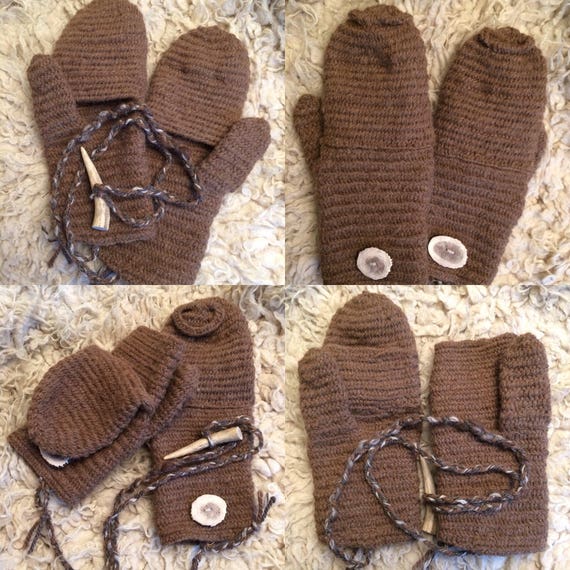 |
| Nålebinding Mittens from Etsy seller Draicraeft |
I still have a lot to learn about figuring out how long to make my starting chains, which change size rather dramatically after I've worked a few rows. I also found that the tension on the starting loop for the thumb was a bit loose, but as far as first naalbinding projects go, I feel like I could do a lot worse.
Next up (after the mitten flap), I want to make a pair of socks in York/Jorvik stitch. Just as soon as I spin some more (slightly thicker) yarn for them. After all, how long could that take?
No comments:
Post a Comment